
50 Bash Script Examples to Kickstart Your Learning
Writing Bash scripts may appear challenging at first. However, once we understand and get familiar with it, writing sequence commands efficiently will be a walk in the park. We will totally rely on it to automate the processes. This will save us from hours of manual work. This will help streamline the entire flow. In this tutorial, we will familiarize ourselves with 50 Bash Script examples to get started.
Hello World
When trying to get familiar with any programming language, the first piece of code which we generally come across is to print Hello World on the screen. To do the same in Bash, we need to open our favorite text editor, place the following snippet and give it a meaningful name with a .sh extension.
Example:
#!/bin/bashecho "Hello World"echo Hello Worldecho 'Hello World'
This script needs to be given the permissions to execute. We do this by the chmod command, which we learn in detail later in this article. We are not required to compile the script. We can run it directly using the command sh or use the ./ operator as shown in the below screenshot.
The first line of the code should always begin with the shebang line. This line informs the shell which interpreter to use to run our code. To display the output on the terminal we use the echo command. It is supposed to be followed by the string. Bash does not explicitly want us to wrap our text with double quotes. However, as a good practice, we should. We can also use the single quotes (').

Arithmetic Script
Writing a script to perform basic arithmetic operations might appear a bit tricky at first. We have to note, in our script, that we cannot directly use the arithmetic operators on the variables.
Example:
#!/bin/bash a=10b=2 echo "$a + $b: $((a+b))"echo "$a - $b: $((a-b))"echo "$a * $b: $((a*b))"echo "$a / $b: $((a/b))"
As usual, we need to begin with the shebang line. The integers are in the respective variables. One flexibility with bash script is that we do not provide the datatype while declaring the variable. We are doing the basic addition, subtraction, multiplication and division. The variables can be printed by prefixing them with a dollar sign. However, we cannot directly use the arithmetic operators directly on the variables. $a -$b will just display 10 - 2. To make bash understand that we want to carry out the arithmetic operation we need to surround the entire expression by the dollar symbol followed by the double parentheses (()).

Check if a file exists
We often want to examine the status of such files, whether they exist or are empty. To do so we have a simple script with an if condition.
Example:
#!/bin/bash File=/etc/passwd if [ -f "$File" ]then echo "$File exists" fi
Usually, we employ the if statement for conditional branching and cater to numerical or string comparisons. However, we can determine the status of a file as well. Bash provides us with certain options which we can directly use on any given file. We can couple those options with the Bash if statement to develop conditions. For this case we bring the -f flag into the picture. If the file exists, we get a zero return status. This indicates that the result is true and the then block of the code executes.
This check is widely used to redirect outputs only if the file exists or to verify if the file was downloaded.

Echo command
In this example we will also see how we can create statements as well as a simple log file by redirecting the statements to a file.
Example:
#!/bin/bash name="X"echo "Hello World, $name"echo Hello World, $nameecho 'Hello World, $name'echo "Hello World, again. $name" >> logfile.log
To display the output on the terminal we use the echo command. It is supposed to be followed by the string. Bash does not explicitly want us to wrap our text with double quotes. However, as a good practice, we should. We can also use single quotes to print. However, the variables won’t be expanded in this case. It will simply treat it as a string and on the terminal will print the string Hello World, $name. The last echo statement will be written to a log file rather than the standard output.

Redirect output to file
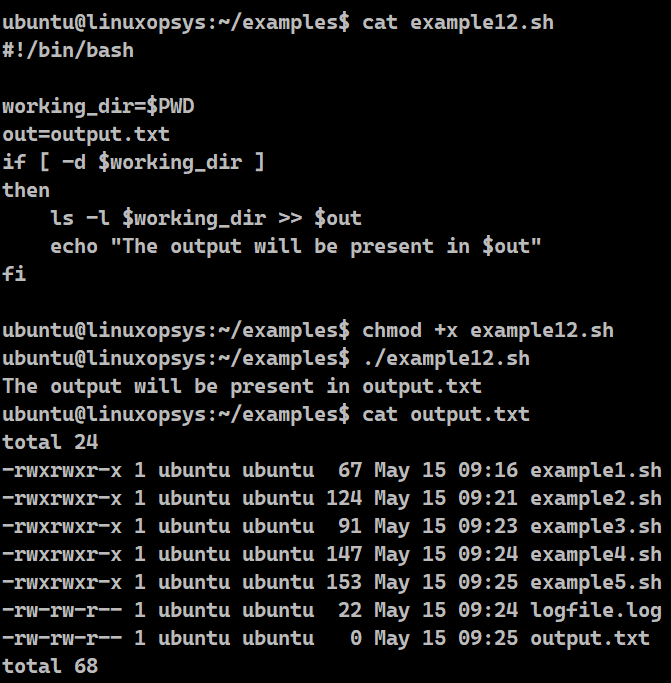
In this example, we are going to apply the ls command with the -l option on the current working directory and redirect the output to a file named "output.txt" with a success message.
Example:
#!/bin/bash working_dir=$PWDout=output.txtif [ -d $working_dir ]then ls -l $working_dir > $out echo "The output will be present in $out"fi
Bash has provided us with the redirection operators whose sole purpose is to redirect the information to a file. We are checking if the directory exists. If it does, we are moving the result of the successfully executed ls -l command to out.txt. For that we have the redirection symbol (>). To verify that the redirection was successful, we have used the cat command which will show us the contents of the file. The file will get overwritten each time we run the script and the previous result will be wiped. To ensure that Bash keeps the previous results intact and appends the output, we have to use the double redirection arrow (>>) .

File rename
We have created an interactive script that will read the user input and check if it is a file. Only if the user input is a file, we rename the file with the timestamp.
Example:
#!/bin/bash read -p "Enter file name " nameif [ -f $name ]then timestamp="$(date +"%T")" mv $name ${name}_${timestamp}fi
The script prompts the user for a file name. It verifies its existence. For that it uses the -f flag in the if expression. If it does, it renames the file with a timestamp. To generate the timestamp we have used the date command with the formatter as %T. This ensures that the time will be in 24 hours format. It will also list the minutes and seconds. All of them will be separated by a colon (:). The format is in HH:MM:SS. The new file gets the same name with an appended timestamp. And the old one is lost.

File permission
We have taken an example to demonstrate how we can create a script to check the existence of a file and provide all the privileges to the user, but only read permissions to the group and the others.
Example:
#!/bin/bash read -p "Enter file name " nameif [ -f $name ]then chmod 744 $namefi
This script prompts the user to provide a file name. It then checks if the file exists using the -f flag in the if expression. After verifying its existence, it changes the permissions of the file. In our script, we have changed the permissions to read, write, and execute for the owner. For everyone else (group and others), we made it read-only. This will ensure that others can only look at it but cannot modify it. The number 744 is a decimal representation. Think of it as 3 separate numbers 7, 4 and 4. The first digit from the left represents permissions for the user, the second digit is for the group and the rightmost is for others.
Ultimately, we add these numbers depending on the level of permission needed. To give our user read, write and execute privileges, we need to take the number 1, 2 and 4 and sum them to get 7.

Copy a directory
In this example we will perform a recursive copy of the directory and all its contents. Then we will also carry out a secure copy of the same directory to a remote machine using the scp command.
Example:
#!/bin/bash cp -r dir1 dir2#scp -r /path/to/directory user@machine_b_ipaddress:/path/to/destinationscp -r dir1 user@ip-address-or-hostname:/home/ubuntu/dir2
In this script, we have used the -r flag with the cp as it is necessary to inform Bash that it needs to repeat the copy command for all the files and sub-directories within the directory dir1, the parent directory. Since this is a copy, dir1 will remain untouched. We will have a copy of dir1
We can also perform a secure copy (scp) over ssh. Please make sure to pass the username and hostname as per your environment. Also ensure the SSH password less authentication is enabled to automate the entire flow. After making the connection to the remote machine, the dir1 present in our local machine will get recursively copied to the host machine at /home/ubuntu/dir2.

Delete file
We have created a script where we have combined the find with the rm command. We are asking the user to provide us with the name of the file. If that file exists, we find its location and delete it on the fly.
Example:
#!/bin/bash read -p "Enter file name " nameif [ -f $name ]then find /home/ubuntu/ -name "$name" -type f -exec rm {} \;fi
If we know the path of the file, we can remove it directly by navigating to that path. But, chances are we might only remember the name of the file. We can search and then delete it in the same command. For that we used the find command and gave the rm command in the exec option. In our example, we are looking for a file named "abc" recursively inside the /home/ubuntu directory and executing the rm command once we find it. Newer versions of find command have the -delete option too. Instead of using the -exec rm -rf {} \;, we can simply use the -delete to delete all matched files.

Read a file
We have created a simple interactive script to prompt the user with the file name. After performing the necessary existence check, we will read it.
Example:
#!/bin/bash read -p "Please enter a file name to read " nameif [ -f $name ]then result=`cat $name` echo $resultelse echo "Input provided isn't a file. Please check again"fi
We are asking for the file name from the user. Based on the input we receive, we verify if it is indeed a file using the -f option as the expression in the if statement. If the input provided is a file, we will read the file into a variable. We can display the result on the standard output using the cat command or echo the contents of the variable. That variable can be used accordingly by our script. We only need to declare a variable and equate it to the cat command. We need to make use of backticks before starting and ending the cat command.

Read a file line by line
In this example, we have combined the while loop with the read utility. In each iteration, the script stores the line in the variable. After the script is through with the last line, the control will reach the next line after the done statement.
Example:
#!/bin/bash filename=sample.txtwhile read -r linedo echo "$line" #printing the line; can perform any other operation on $linedone < $filenameecho "----- Reading of $filename is over-----"
For each iteration of the while loop, the read command reads that particular line of the file and assigns it to the bash shell variable $line. The loop runs till the number of lines in the file. After reading the last line of the file, the while loop stops. The -r flag of the read command prevents the interpretation of any backslash-escaped characters while reading.

Append to file
Many times, we want the output to keep writing to the same file. We just need to use the double arrow redirection operator (>>) after the command in our script. This example is especially useful to create log files.
Example:
#!/bin/bash working_dir=$PWDout=output.txtif [ -d $working_dir ]then ls -l $working_dir >> $out echo "The output will be present in $out"fi
Bash has provided us with the redirection operators whose sole purpose is to redirect the information to a file. We are checking if the directory exists. If it does, we are moving the result of the successfully executed ls -l command to an already existing out.txt. The file will not get overwritten and the previous information will not be wiped if. This is because of the use of the double redirection arrow (>>) as shown. The file will not get overwritten each time we run the script and the previous result will be intact.
Listing files and directories
In this example we are prompting the user to enter a directory path. After checking for its existence, we list the files and directories in that directory. The example shows how the ls command supports a number of flags to give detailed information as well.
Example:
#!/bin/bash echo "Provide a path to the directory"read dirPath if [ ! -d "$dirPath" ]then echo "Directory path $dirPath doesn't exist on the file system."else echo "ls command in $dirPath" ls $dirPath echo "ls -a command in $dirPath" ls -a $dirPath echo "ls -l command in $dirPath" ls -l $dirPath echo "ls -lt command in $dirPath" ls -lt $dirPathfi
We are asking the user to provide us with a directory path whose contents we want to list. Once we have captured the user input in a variable, we verify if it exists or not. For that we have used the readily available -d option in the if command expression to determine if the directory exists. If it doesn't, display a statement informing the user that the input isn’t a directory or it doesn't exist. But if the input is correct, we are listing the contents. To list the hidden files, we provide the -a option. To fetch the detailed list, we have supplied the -l flag. Similarly, to sort the contents timewise (latest first), we use the -l and -t flag together.

System information
We have developed a simple bash script that reads a file containing the server addresses. One by one, it logs in to that remote server and fetches the information about the remote systems like the kernel version, hostname, uptime, username.
Example:
#!/bin/bashserverlist=`cat ipList.txt`for ip in $serverlistdo ssh user@ip-address-or-hostnameecho "OS is " `uname -a`echo "Kernel information is " `uname -r` echo "Hostname is " `hostname`echo "Uptime " `uptime`echo "Username is" `whoami`exit done
We have read a file that contains the list of IP addresses. We stored this in a variable. For every iteration of the for loop, the script is doing a secure connection to the remote server using the ssh command. While trying out this example, remember to replace the username and add the IP address of the server. Also ensure the SSH password less authentication is enabled to automate the entire flow. Once we make the connection to that server, we are fetching the basic system information like the OS name, the kernel version, the hostname, the username and the uptime. These commands are simple enough. After we are done finding the information for one remote server we have to quit the connection and repeat the same steps for all the remaining ones. Hence we have used the for loop.

Variables
In our example we have declared variables, which will be the bedrocks of our code. We have taken 3 variables, 2 of them with integer values. The third variable is going to store the sum of the first two variables.
Example:
a=5b=10result=$((a+b))str="Sum is"echo $str $result
We have declared four Bash variables. Variable 'a' holds the integer value 5 and 'b' holds the value 10. We have a third variable 'result' to store the sum of a and b. We have used another variable holding a string. As we can notice, we do not need to specify the datatype, be it an integer or a string. When we echo the result variable, we get the sum as 15.

Combine strings in a variable
From this example, we will understand how easily we can concatenate strings in Bash.
Example:
a="I am in variable a"b="I am in variable b"echo $a and $bb+="I have added another string in variable b"b+=$aecho $b
In the script, we have taken two variables holding two strings. When we echo them one after the other, we are effectively concatenating them. As we know Bash is flexible, we have another way of joining multiple strings to make a concatenated string. We need to use the operator +=. This operator connects strings using one or more variables or directly strings. In our case, we have concatenated the variable b with its original string, a new string and variable a.

Create a function
We have created a function to add two different numbers which we are going to use again and again in our code. We are performing the addition 10 times. Instead of writing the same code 10 times, we can see in our script, how it saves us from repeating the same task.
Example:
#!/bin/bash sum(){ number1=$1 number2=$2 result=$((number1+number2)) echo $result} addition=$(sum 4 8)echo "Sum of 4 and 8 is $addition"
We have created a function sum that takes two variables. It adds those two variables and stores the result We have created a function sum that takes two variables. It adds those two variables and stores the result in another variable which we echo on the screen. To invoke the function we need to give the function name. Since the function expects two numbers. we provide them with space-separated parameters. Hence, we will first get the sum of 4 and 8 as 12. This will be stored in the addition variable. Then we will echo it with a statement that will print "Sum of 4 and 8 is 12". Every time we just need to call the function and pass the arguments, rather than writing the same piece of code over and over.

Date
In this example we are fetching the date, day, time, and the time zone and displaying them on the screen. We have created a script with the date command in different formats to illustrate its importance. This includes fetching the day of the week, the time without seconds, yesterday's date etc. We have also created log entries with date in this example. We also append a timestamp to the filename.
Example:
#!/bin/bash now=`date "+%T"` #storing date, day and time in a variabledate '+%Y-%m-%d' #YYYY-MM-DD formatdate "+%H:%M" #HH:MM formatdate "+%T" #HH:MM:SS formatdate -d "today + 1 hour" +'%H:%M' #Time 1 hour later in HH:MM formatdate -d "yesterday" # Yesterday's day, date and timedate -d "2 days ago" '+%A, %Y-%m-%d' # Day before yesterday's informationecho "[$now] We have created a log statement beginning with a date" >logfile.log #log entrycp logfile.log "logfile.log_${now}" #logfile with date and time appended
The date command fetches the system date, day and time in 24 hour format and also displays the time zone.We are storing it in a variable for later use. We can decide how we want the data coming from the date command by formatting it. %Y gets the year, %m the month, and %d the date. Similarly, %H will display the hours, %M minutes and %s seconds. To get the time in hours, minutes and seconds we can directly use the %T formatter.
Bash allows us to get the future time as well. In our example, we are getting the time 1 hour from now. Similarly we can get the date and time of yesterday or even days before as per our needs. We can format the output further.
We are using the stored output of the date command in the variable and towards the end of the script, we are creating log entries with that variable. Lastly, we have made a copy of the log file and added the timestamp to its name.

Calendar
In this example, we have asked the user to provide us with the month number. Based on the input, we are fetching the calendar of the current month and displaying it on the terminal.
Example:
#!/bin/bash read -p "Enter the calendar month number (1-12): " mif [ $m -gt 12 ] || [ $m -lt 0 ]then echo "Invalid input. Please enter a number between 1 to 12"else y=`date +'%Y'`cal $m $yfi
The script begins by prompting the user for the month number. If the number is not between 1 to 12, it displays an error message. If the input lies between 1 to 12, we first fetch the current year from the date command. We store this year in a variable. We pass this year as well as the user provided month to the Bash cal command. This will display the calendar in the Gregorian format.

Sleep
We can have a Bash script to delay the execution of a certain command using the sleep command. We are sleeping for 100 milliseconds
Example:
#!/bin/bash date +"%T.%N"echo "Going for a 100 ms sleep"sleep 0.1echo "After sleeping for 100 ms"date +"%T.%N"
We have used the date command with the sleep command to delay the next execution of the date command for a given length of time. The pause specified in our case is 60 seconds. We have taken the default time intervals in seconds. We can pass it in minutes, hours and even days. The sleep command can accept floating-point numbers as well. It allows multiple values, which get added together to calculate the sleep duration.

Wait
We have developed a script using the Bash wait command to wait for the completion of a running process. The wait command is associated with the PID or the job id of the process.
Example:
#!/bin/bash echo "Hello World" &pi_id=$!echo "Hello World again" &wait $p_idecho "Job is over. Exit status is $?"
The wait command pauses the execution until the process ID or the job ID terminates. If that is not mentioned, the wait command waits until all process IDs have terminated with a zero exit status. In our example we have created a background process. We are saving the process id of that echo command in the p_id variable. When we give the wait command with that process ID, then the next command waits for the completion of the echo command. The notation '$?' is used to get the exit status of the previous command.

Comments
We will come across comments in every programming language. We have made comments throughout our Bash scripts to make the code easily understandable to any person going through the code.
Example:
#!/bin/bash #My first comment#printing a statementecho "Enter name" #Taking user inputread name #Displaying the outputecho "Hello $name"#echo "Good day, $name
To make single line comments in our script, we just need to use the hash (#) symbol to begin commenting. Our scripts can take infinite comments as there is no limit. Sometimes, we also use comments to ensure a few specific lines of code do not execute. In our case we have made sure that the last line of the script, which prints a statement, doesn’t execute. Any line beginning with #, except the shebang, can be safely assumed as comments and won’t be compiled or used in our code.

Multi-line Comments
Although Bash doesn’t support block comments we have still inserted multiline comments in our script. We used the heredoc redirection as a workaround to insert a block of comments.
Example:
#!/bin/bash << 'COMMENT' We have a multiline comment. We can use it anywhere.COMMENT a=alphaecho $a
Heredoc is generally brought to use when we need to pass more than one input line to a command. However, if we do not specify any command in the heredoc, the lines will have no effect on our code and will effectively serve as a way to comment multiple lines. We are free to give the heredoc any name.

While loop
In our example, we print the numbers from 5 to 10 sequentially by employing the while loop so that we can iterate a block of statements repeatedly.
Example:
#!/bin/bash i=5while [ $i -lt 10 ]do i=$((i+1)) echo "Hello World $i"done
While loop is a control flow statement that allows code to be executed repeatedly based on a given Boolean condition. In our script example, we monitor the value of the variable "i" in every iteration. We check if it is less than 10. We began with 5. In every iteration, we added 1 to it. Everytime, when it was less than 10, we displayed Hello World text with the value stored in the variable.

For loop
In our example, we print the numbers from 95 to 100 sequentially using the for loop. We increment the iterator by a factor of 1 and end at 100. The command-line tools like seq and eval can also be used as expressions for the loop.
Example:
#!/bin/bashfor (( i=95; i<=100; i++ ))do echo "$i"done
Every for loop in Bash begins with the keyword 'do' followed by the commands inside the block. Similarly, it is closed by the 'done' keyword.The number of times a 'for loop' runs is dependent on the declared list of variables. After the first execution of the block of code or commands between 'do' and 'done', the loop chooses the next subsequent item from and repeats the complete cycle again.
In our example, the initial value of the iterator (i) is set to the starting number 1. This is the first expression. The loop executes, as long as the condition is true. The maximum value cannot be more than the last number of the range. The final expression in the loop corresponds to the step factor that increments or decrements the variable by that value. In our case it has to increment by 1 and keep on doing it till the variable is less than equal to 5.

Until loop
In our example, we print the numbers from 0 to 4 sequentially using the for until loop. The until loop in our code block will execute a set of commands until the condition becomes true.
Example:
#!/bin/bash i=0until [ ! $i -lt 5 ]do echo $i i=$((i + 1))done
The expression inside the until command is evaluated. If the resulting expression is false, the instructions inside the do statement get executed. Our script adds the 1 to the variable each time. When the expression becomes true, no statement inside the loop executes. The script moves the cursor to the next line after the done statement. This eventually marks the end of the until loop.

Read user input
We often come across interactive scripts in Bash. These scripts prompt for user inputs. We have developed one such script where we take input from the user, process it and acknowledge the output to the user.
Example:
#!/bin/bashecho "Enter name"read nameecho "Hi, $name"echo "Do you want to read another name (Y/N)"read choiceif [ "$choice" == "Y" ]then echo "Enter another name" read name echo "Hello, $name"else echo "Input is not Y. Exiting" exit 1fi
The read command accepts only a single line from bash shell. It assigns the values of each field in the input line to a shell variable. The characters in the IFS (Internal Field Separator) act as the separators for this assignment.
The script asks the user to enter the name. After printing the message it asks the user to enter a choice. If yes, it asks for another name. Otherwise, it exits by displaying a message pointing out the fact that the choice entered is not Y.

If statement
We have used an if statement for developing conditions. The script below compares the values of two operands and returns either a true or a false.
Example:
#!/bin/bash var1="Football"var2="Football"var3="Hockey"if [ "$var1" = "$var2" ]; then echo "variables are equal"; fiif [ "$var1" = "$var3" ]; then echo "variables are equal"; fi
In our script example, we have declared three string variables. We have named them as val1, val2 and val3 and assigned them the respective values. With if statements we can test the equality of these string variables. The value of the variables can be compared by using either the equal symbol (=). It is a good practice to surround the variables with double quotes ("..."). If the values of these variables match, we display true.

If then else condition
The script uses the Bash if then else conditions for conditional branching to cater to comparisons. These can be numerical, string, or both types of comparisons.
Example:
#!/bin/bash echo "Do you want to read a name (Y/N)"read choiceif [ "$choice" == "Y" ]then echo "Enter name" read name echo "Hello, $name"else echo "Input is not Y. Exiting" exit 1fi
Our script prompts with a message. It asks the user for his choice. If the user provides 'Y', it asks the user to enter a name. It stores the input in a variable. It then prints a hello message with the user input present in that variable. Otherwise, it exits by displaying a message pointing out the fact that the choice entered is not Y.

Make directory if it doesn’t exist
Creating a directory is pretty straight forward in Bash scripts. We use the mkdir command. Our script uses the same command passed with the -p flag creates directory only if it doesn’t exist
Example:
#!/bin/bash dir_to_create=dir1if [ ! -d "$dir_to_create" ]; thenmkdir -p "$local_directory"echo "Local directory created: $dir_to_create"elseecho "Local directory already exists: $dir_to_create"fi mkdir -p /home/ubuntu/dir1/dirA/dir1_A[ -d dir2 ] || mkdir dir2
The mkdir command, combined with the -p option, will create a directory only if it doesn’t exist. We can put the condition inside the if statement to check if the directory exists or not. Hence, dir1 will get created in our case.
We are also demonstrating the use of the command to create any intermediate directories that don't exist. In our case it will create dirA and inside it we will have dir1_A. We can also produce an error when directories exist. And create the directory if it doesn't. For that we can use the test alias. It checks the existence of the directory dir2 first. If not present, it will create it.

Case condition
We have created a script with a menu asking the user to provide us with a choice. For this we have used the case statements. We have developed different cases, based on the received input. It is another way of expressing the if elif else conditional statement.
Example:
#!/bin/bashecho "Pick your favorite city" echo "1 - Paris"echo "2 - London"echo "3 - Moscow"echo "4 - New Delhi"read citycase $city in 1) echo "It is in France";; 2) echo "It is in England";; 3) echo "It is in Russia";; 4) echo "It is in India";; *) echo "This city is not on the list.";;esac
In our example, our script lists the options and asks the user to pick one. It then stores the provided input in a variable. Our case statements have the responses corresponding to the input. The output is the text coming from the echo command. If the input provided is not between 1 to 4, the last case gets called. The case statement ends with the esac statement. It is "case" written from right to left.

Get arguments from command line
Many times, we provide the input with the script itself. Our script expects those arguments to process it further. If we fail to provide those arguments, the script will treat them as empty strings. These arguments are stored in special variables. This particular example is accepting 4 arguments.
Example:
#!/bin/bashecho "Argument 1 is $1"echo "Argument 2 is $2"echo "Argument 3 is $3"echo "Argument 4 is $4"
We can run this script with arguments as follows:
The arguments passed to our script will get processed in the order they are being sent. It will be from left to right. These arguments are stored in special variables. The indexing of these variables begins from one. This implies that the first argument can be accessed using $1.The same way, our second argument will be present in $2. Our script is looking for four arguments. If we provide less than four, the remaining arguments become empty strings. If we provide more than four, only the first four will get saved in these positional variables and the remaining will be discarded.

Get substring
There could be a situation where the entire string is of no use to us. But that string may contain a keyword that may be of value. Hence, our script removes unnecessary parts from strings and extracts the substring.
Example:
#!/bin/bashexpr substr "www.ourwebsite.com" 5 10str="www.ourwebsite.com"echo ${str:4:10}cut -d . -f 2 <<< "$str"
We have two approaches for finding substrings. One is an index-based mechanism and the other is pattern-based. The index-based substring is extracted from the original string by its start and end indexes. For the expr command, we indexing begins from 1 and we are extracting 10 characters starting from the 5th position. In the next case, the indexing begins from 0. The 4th index refers to the 5th position. We are extracting 10 letters from the 4th index.
For pattern-based substrings, we have used the cut command. The delimiter passed is the dot (.). We have specified that we want the second field. Therefore, we get "ourwebsite" as the result.

Get string length
We can get the string length easily in Bash scripts.
Example:
#!/bin/bashstr="www.ourwebsite.com" echo ${#str}echo $str | awk '{print length}'
We have used the hash (#) operator in the script to get the length of text present in the string variable. We can even use the awk command. We have to use the keyword "length ". It is available with awk that prints the value. The string is provided to the awk command after piping (“|“) with the echo command. We echo the string variable "str" and then pipe the output to the awk command. In the awk command, we print the length.

Replace string in a variable
Another simple yet useful example is a Bash script to find strings and replace it.
Example:
#!/bin/bashstr="www.anexample.com" echo ${str/example/otherwebsite}echo $str | sed "s/example/otherwebsite/g"
With Bash, we do not require any libraries or lines of code to find and replace strings. All we need to do is string manipulation. Our script looks for the substring "sys" in the defined substring. Since it is there, it replaces it with the word "otherwebsite". This displays "www.anotherwebiste.com".
The other option is to use the powerful sed tool available to us. We simply need to pipe the output of the echo command of the string to the sed. The option 's' considers files as separate rather than as a single continuous long stream. The '/g' flag performs the substitution globally on a line. Without this flag, only the first find and replace will occur.

Add 2 numbers in a variable
Adding two numbers may appear challenging at first. But once we understand this example and its working, we will never forget the syntax.
Example:
#!/bin/basha=5b=10 result=$((a+b))echo $result result2=`expr $a + $b`echo $result2
We have declared three Bash variables. Variable 'a' holds the integer value 5 and 'b' holds the value 10. We have a third variable 'result' to store the sum of a and b. In the first case we are adding the numbers by surrounding the arithmetic expression with double parentheses. This will store the result as 15, the sum of 5 and 10. Another technique we have employed is to use the expr command to perform the addition. Using backticks, we write the result of this command to another variable result2. When we echo, we see the value of 15.

Create an array
To hold multiple values at the same time, we have created a script to use arrays. The first one is an indexed array holding the name of the continents: Europe, Asia and Australia. The next array is an associative one that acts as a key value pair to store the name of the city and the country like Paris- France, Vienna-Austria, Oslo-Norway.
Example:
#!/bin/bashdeclare -a arr=("Europe" "Asia" "Australia")echo ${arr[2]} declare -A array=(["Paris"]="France" ["Vienna"]="Austria" ["Oslo"]="Norway")echo ${array["Oslo"]}
Our script first creates an indexed array. Indexed arrays are arrays in which the elements are stored and assigned with an integer number starting from 0. The elements inside the array are referenced using the index number. When we print arr[2], we get the element at the second position. The result is Australia.
We are also creating associative arrays. They behave like a map and the values are made accessible using a key. The associative arrays have to be declared with the keyword with the -A flag. This is a must. When we reference the array with the key we get the corresponding value. array["Oslo"] will have the value Norway.

Display the array
Iterate over indexed arrays
We can iterate over the entire array elements using any of the Bash loops. We are iterating over the entire array elements using any of the Bash loops. In this example, we are getting the length of the array (say n) and iterating over the array elements one by one. We start from the zeroth position till the end. This way we print the elements of the array from arr[0] till the arr[n-1]. This will print the elements from Europe to Africa. We can iterate over the entire array elements using any of the Bash loops.
Example:
#!/bin/basharr=("Europe" "Asia" "Australia") arr+=("Antarctica" "Africa") echo "--------- for loop over elements---------"for i in ${arr[@]} #Using for loop over elementsdo echo "$i"done echo "--------- for loop with index---------"for (( i=0; i<${#arr[@]}; i++ )) #Using for loop with indexdo echo ${arr[$i]}done echo "--------- while loop---------"i=0while [ $i -lt ${#arr[@]} ] #Using while loopdo echo "${arr[$i]}" i=$((i + 1))done echo "--------- until loop---------"i=0 #Using until loopuntil [ $i -ge ${#arr[@]} ]do echo "${arr[$i]}" i=$((i + 1))done
We have used the parameter expansion with ${arr[@]} to return all the elements of the array. We can do the same with ${arr[*]}. After this, we just looped through the elements.
There is no particular order in the output. It differs from the order of initialization. In index based arrays, we used ${#arr[@]} to retrieve the number of elements in the array. Index values are actually the keys in the map. Associative arrays return keys rather than indexes. Therefore, this incremental looping is not apt for maps.

Iterate over associative arrays
Let’s see how we can iterate over an associative array. We have created a simple script to access the associative array keys and values using the for loop. This script iterates over the keys. For every key, it accesses the corresponding value of the array. Hence, the output will be in the form of city: country. We have used the '!' symbol for reading the keys of the associative array. Let’s see how we can iterate over an associative array.
Example:
#!/bin/bash declare -A arr=(["Paris"]="France" ["Vienna"]="Austria" ["Oslo"]="Norway")for i in ${!arr[@]} do echo $i:${arr[$i]} #key:value done
We have used a for loop to iterate over the keys of the array. Since this array is basically a map of keys and values, we can access the corresponding values of the array. To read the keys, we have to use the special '!' symbol. We will get to see all the keys of the array followed by the value in each line.
There is no particular order in the output. It differs from the order of initialization. In index-based arrays, we used ${#arr[@]} to retrieve the number of elements in the array. Index values are actually the keys in the map. Associative arrays return keys rather than indexes. Therefore, this incremental looping is not apt for maps.

Exit status
Our script is fetching the return status to determine if the execution of the command was successful or not. It is used by the conditional commands.
Example:
#!/bin/bashtouch /home/ubuntu/example.txtRC=${?}echo $RC touch /root/example.txtRC=${?}echo $RC
In our script; we are trying to create a file in our home directory. The exit code for touch is 0. This indicates that the previous command, touch was successful. In the next case, we are trying to create another file in the root directory. As we know we do not have sudo privileges, the touch command will fail. We can ascertain that from the fact that the exit code is anything other than 0. From this we can infer the command failed.

Trim whitespace from a variable
Our script will try to remove the unnecessary white spaces from a string by using the tr command as well as the sed command.
Example:
#!/bin/bashecho " It is a bright day today " | tr -s '[:blank:]' echo " It is a bright day today " | sed -r 's/[[:blank:]]+/ /g'
Our script initially uses the tr command. It is used for translating characters. But we can also remove the whitespaces. The -s option represents squeeze. This removes sequential occurrences of a character, in our case, it is a blank space.
The other command our script executes is the sed command. The -r flag is for extended regular expressions. The s character represents substitution. Our script has two patterns between the slashes(/). The second pattern replaces the first one in the string. The script substitutes the [:blank:] with nothing. This removes the unwanted characters.

Monitor
Monitor for multiple servers, have a file with server list and ssh to get the results to another file.
We can develop a script to monitor the CPU, the memory, and the disk usage. We can document the results to a file.
Example:
#!/bin/bashprintf "CPU\t\tMemory\t\tDisk\n" >> monitor.txttop -bn1 | grep load >> monitor.txt #cpufree -m >> monitor.txt #memorydf -h >> monitor.txt #diskCPU=$(top -bn1 | grep load | awk '{printf "%.2f%%\t\t\n", $(NF-2)}')MEMORY=$(free -m | awk 'NR==2{printf "%.2f%%\t\t", $3*100/$2 }')DISK=$(df -h | awk '$NF=="/"{printf "%s\t\t", $5}') printf "CPU\t\tMemory\t\tDisk\n" >> monitor2.txtecho "$MEMORY $DISK $CPU" >> monitor2.txt
Our script is fairly straightforward. We know how to redirect the output of commands to a file. Our script keeps on appending the results to the same file. First, we are fetching the CPU details. Then we get the memory and the disk usage. We are tabulating the results in the monitor.txt file. We can format our script even further by using awk command to extract the desired results. This will fine tune our output file with the precise details.

Monitor file changes
In this example, we have considered a file to watch for events using the inotify command. We are exiting after monitoring the first change. We are also watching the events of another file continuously without exiting. We are also monitoring a file for changes and exiting when no event occurs for 15 seconds.
Example:
#!/bin/bash echo "[`date`] Monitoring log1.log"inotifywait log1.log echo "[`date`] Monitoring log2.log"inotifywait -t 15 log2.log echo "[`date`] Monitoring log3.log"inotifywait --monitor log3.log
We have built a file watcher to monitor if there are any changes to the attributes of that file or for events such as a file being created or deleted. We are watching to see if the contents of the file are being changed. For this we are using the Linux utility inotifywait. As the name suggests, it will notify us and wait for further instructions.
In the first case, we are monitoring log1.log. The moment the script has found a change in the file, it will end the monitoring of log1.log. In the next inotifywait command, the script will continuously monitor the log2.log file for changes. If no changes are made to this file in the 15 seconds, the script will cease the monitoring. For this we need to pass the -t flag for timeout and provide the timeout value in seconds. In the last line of the code, the script will continue to monitor the file indefinitely, unless there's a manual intervention. For this, we need to supply the -m or --montior option with the command. This command is a very popular tool to monitor log files.

Send email
With Bash we can send emails. This covers an important aspect of the automation process.
Example:
#!/bin/bashTo="me@mydomain.com"Sub="Hi"Msg="Hello! I am sending an email"`mail -s $Sub $To <<< $Msg`echo Mail sent to $To with subject $Sub
Our script uses the mail command to send out an email. It employs the '-s' option command to give the subject to our email. We have defined 3 variables to store the sender’s email address, the subject and the message body. We have added the email message body in the command using the '<<<' operator. This, however, won't work with Gmail. We have to use other providers like the PHPMailer.

Generate random numbers
In our example, we have taken the special Bash variable named $RANDOM. It generates a random number between 0 and 32767. Our script asks the user for a number to even specify the range in which we want to get the random number.
Example:
#!/bin/bashecho "Enter a range: "read rangeecho $RANDOMecho $((RANDOM % $((range+1))))
Our script is generating a random number in the first case. In the second one, we asked the user to provide us with a range. Say the input was 99. We have divided the generated random number by 100 and picked the remainder. This will give us the random number between 0 to 100. The random number will be different from the previous one, everytime we run this script.

Download a file from the internet
We have created a simple Bash script where we will download a file from the internet. For that we need the URL of the file. In this example, we pass that URL to the wget command as well as the curl command.
Example:
#!/bin/bashurl="https://www.justanexample.com/samplefile.txt"wget $urlwget -b $urloutput=samplefile.txt curl -o "output" "$url"
The wget command downloads the files from the server. The user isn't required to be logged in to the system. Our script is downloading the webpage from the URL mentioned. We can also download any file in the background. We need to only specify the -b option with the wget command. We have also included the curl. If Bash is not instructed, curl writes the received data to the terminal. It can save that data into a local file using the -o option.

Get the IP address from hosts
We have used the if config and the ip command in our example to figure out the IP address. Our script carries out string extraction after that. This is because the ifconfig command will produce other information as well like the MAC address, the available networks etc.
Example:
#!/bin/bashifconfig | sed -En 's/127.0.0.1//;s/.*inet (addr:)?(([0-9]*\.){3}[0-9]*).*/\2/p'ip -4 -o a | cut -d ' ' -f 2,7 | cut -d '/' -f 1
In our example, our script is finding all IP addresses using the ifconfig and the ip command. These commands display other network related information as well. Since we are interested in just finding the IP address, we have to perform some string manipulation to fetch that exact information. Here we have piped the result of the ifconfig command to the sed command. And we are extracting the numbers which are in the format of the IPv4 address. Similarly, we are also piping the result of the ip command to cut command twice. This will get the exact address.

Ping a List of hosts
We have written a pinger shell script to automate the ping on a series of IP addresses. With this, we can find IPs which are available. We have enhanced this script further to tabulate the results to allocate them to other systems when needed.
Example:
#!/bin/bashfor ip in `cat ipList.txt`do ping -c 1 $ip 1>/dev/null 2>&1 RC=$? if [ $RC -eq 0 ] then echo "Ping successful to $ip" >> success.txt else echo "Ping unsuccessful to $ip" >> fail.txt fidone
Our script acts as a ping sweeper. Its job is to ping a certain range of IP addresses present in a file. It will store the IP addresses that respond to our ICMP requests in the file success.txt. Otherwise, that IP will be sent to the fail.txt, indicating failure to ping. We use the for loop to iterate through a given IP range. For every IP address we execute the ping command. We have used the -c flag and passed 1. This means we want to ping that particular IP only once to see if the connection is successful. We are not going to retry the ping again.

Backup Script
We have considered an example where our script is dealing with sensitive or personal data. Hence, we are backing up the data. When we say our script is designed to backup some data, it means the script can create a copy of the data, archive it or send a copy of it to another system via scp.
Example:
#!/bin/bashfilename=info.txt backupLocation=/home/ubuntu/backup #---------USING CP COMMAND---------#echo method 1: COPYcp $filename $backupLocation/ #---------USING TAR COMMAND---------#echo method 2: ARCHIVEtar -czvf ${filename}.tar.gz $filename #---------USING SCP COMMAND---------#echo method 3: SCPscp -r $filename user@ip-address-or-hostname:/home/ubuntu/dir2/
We are backing up the file info.txt. The first method involves making a copy of the file in the backup location. Backup location is a path present on the same system.
The second method creates a tarball with the same name. The extension will be tar.gz. This is basically a compressed file. We can get back the backed up file by extracting it from the tarball.
The third option is to perform a secure copy over ssh. Please make sure to pass the username and hostname as per your environment. After making the connection to the remote machine, the file present in our local machine will get copied to the host machine at /home/ubuntu/dir2/.

Find the first 10 biggest files in the file system
There is no direct method to check the largest number of files. In this example, we are combining a few readily available commands to find any number of largest files in the file system. We are tabulating the results by extracting the size and the name of the file.
Example:
#!/bin/bashfind . -type f -printf '%s %p\n '| sort -nr | head -10 > top10.txt echo "Size : File"echo $filelist | while read -r line; do size=$(echo "$line" | awk '{print $1}') filename=$(echo "$line" | awk '{print $2}') echo "$size : $filename"done < top10.txt
The script is employing the find command to get the files. These files are piped to the sort command. We can then easily find the top 10 files present in the Linux file system. For that we need to pipe the result again to the head command. To fetch the first 10 entries we specify -10 with the head command. The dot (.) mentioned after the find command points to the current path from where we are running the script. We store the result in a file named 'top10.txt'. After that we pass those results to a while loop. In every iteration, we extract the size and the filename to create a simple tabled result

Conclusion
Linux Bash scripting is an incredibly powerful tool to automate any task.
It is more than helpful to simplify complex problems.
Bash can be used for software development tasks such as code compilation, debugging and software testing.
Network administrators rely on Bash to test, configure and optimize network performances.
Last updated